Email marketing is difficult as it is! With competition to its core and businesses going digital, small businesses usually struggle to get the visibility that they deserve as they are competing with some already established players. Small entrepreneurs and businesses often struggle about the things to consider when they are planning email marketing campaigns and often questions like Did you last email campaign failed to create the buzz it deserved? Are you not getting enough subscribers? come to their mind.
In this article, I will discuss the various email marketing best practices and things you can do to improve your email marketing campaigns. I will discuss the common mistakes people and companies make while planning these campaigns. We will cover how to get past them with practical examples and steps.
We will cover the following email marketing best practices in this article –
- Automating your emails – Work Smart not Hard!
- Do send time optimization & send emails at the best time – Each individual is different
- Use drip campaigns, set the right frequency – don’t overdo it!
- Follow GDPR guidelines and the can-spam act of marketing!
- Couple SMS alerts with your email campaigns – get the best results!
- Use awesome looking email templates
- Use RSS feed URL to gain the maximum output + traffic!
- Try to avoid spam folder – better deliverability
- Create a list that is interested in your emails
Automating your emails – Work Smart not Hard!
75% of revenue generated from emails across the internet is through automated emails. If you are just starting out you might think that it is a good practice to start sending customized individual emails but what happens when your list grows and you have to create a huge amount of funnels? It can get a confusing and daunting affair to trust me I have been there !!
Almost all the marketers believe that you need to automate your email campaigns to scale any business and it is the number one best email marketing practice you need to follow. All the emails you go through are mostly automated emails like the abandoned cart emails, welcome emails, thank you emails, subscription confirmation emails, etc.
Number one is in our list of email best practices is automating your work with the use of autoresponders.
So you need the best autoresponders tools to automate your emails which are efficient I will cover a couple of tools along with steps on how to automate your emails so you get the hang of it –
- How to automate and send 9000 free emails per month along with unlimited subscription contacts storage?
Sign up in the tool – Absolutely Free!
For moving forward you need to sign up first, hope you have done that.
You can reach the automation screen in two ways I have discussed both the ways although one is a long way still I covered it supposing someone finds it and gets confused both take you to the same goal.
- In your dashboard you can click on the automation tab in the header and then click on the button “create your first workflow“
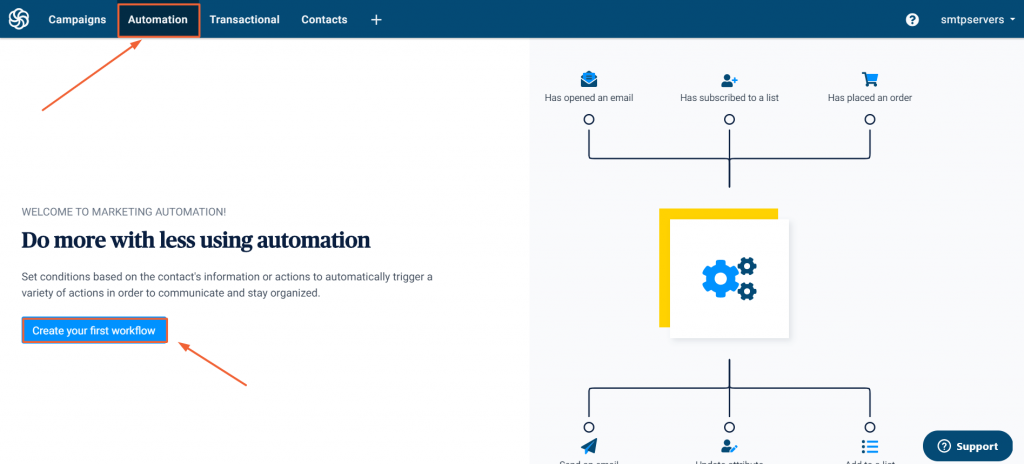
OR
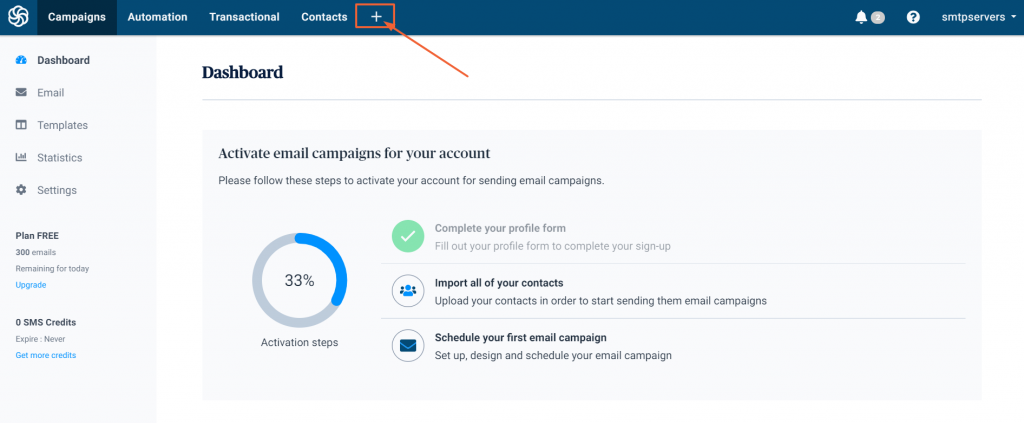
- In your dashboard, you will see a “+” sign in the header menu click on it as shown in the image below
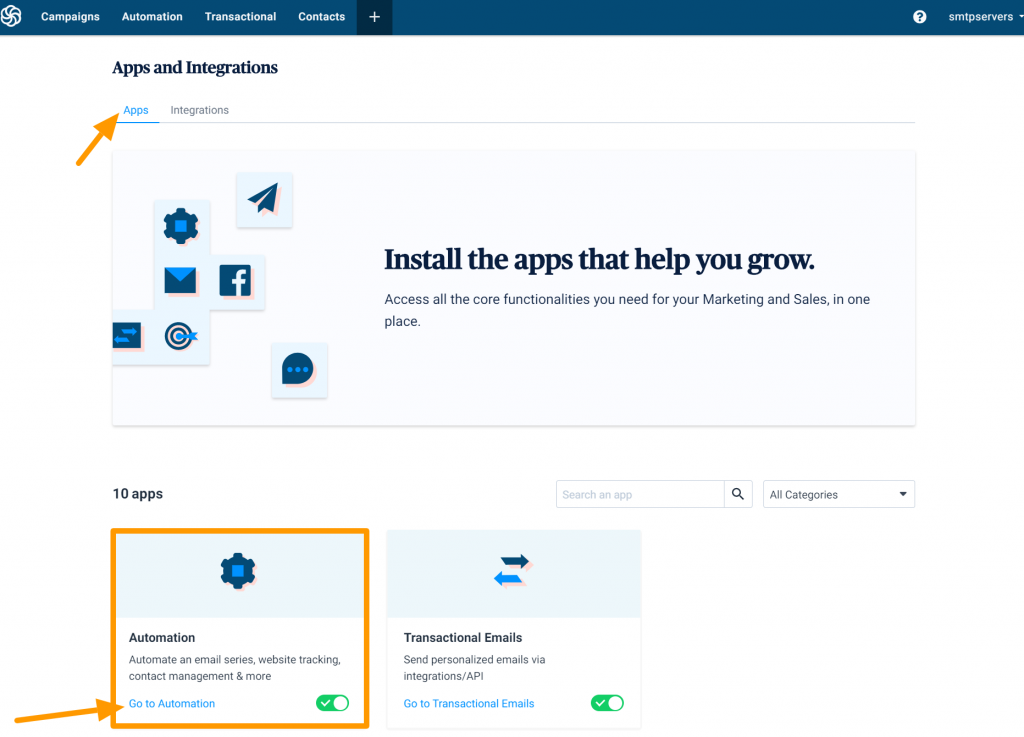
- As shown in the image below click on the Apps tab, and drag down to the automation field to make sure that the automation tab’s toggle is green. Click on the “Go to Automation” option
Now you can create using two options –
- Creating a custom workflow OR
- Choosing from already present Workflow Library (you can customize it as well)
Let’s discuss both the ways in detail
You can create a custom workflow
- In the automation tab you will find a “create a custom workflow button” click on it
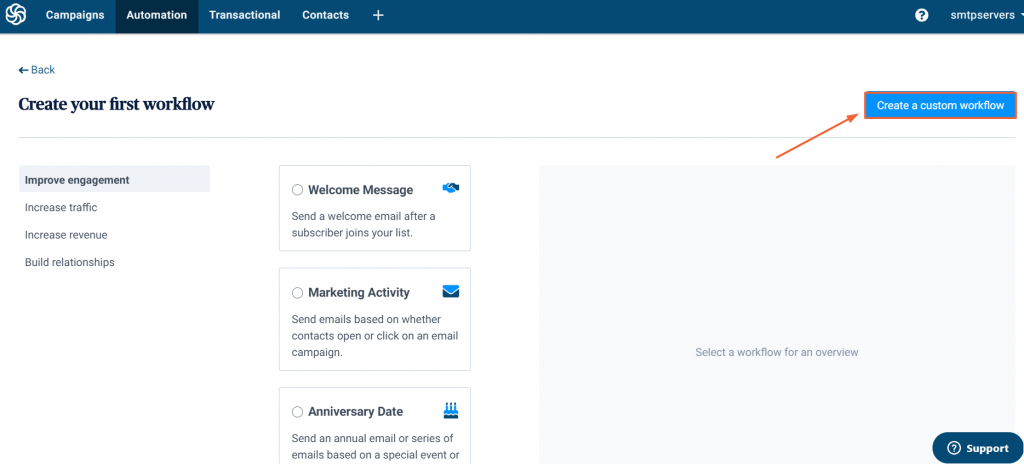
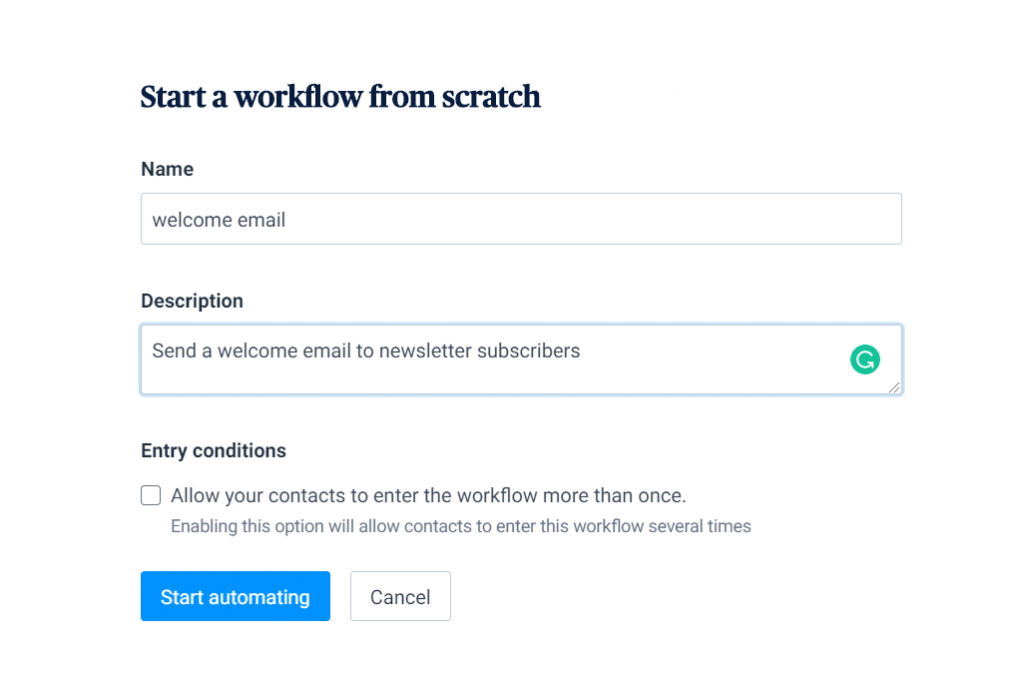
- Once you click the “create a custom workflow” button you will enter a screen as shown below where you have to define the name of your workflow and description. You can also choose if you want your client to enter the workflow multiple times. For this example, I am setting up welcome emails with this tool. For welcome emails, I have not selected the options of entering the funnel multiple times as you don’t want the same person to enter the funnel again & again. Suppose a person visits your website and he enters the email Id and then after some days he visits your website again, doesn’t remember that he is already your subscriber, gives his email ID again you don’t want the same multiple emails landing in his inbox multiple time that will just lead to poor user experience.
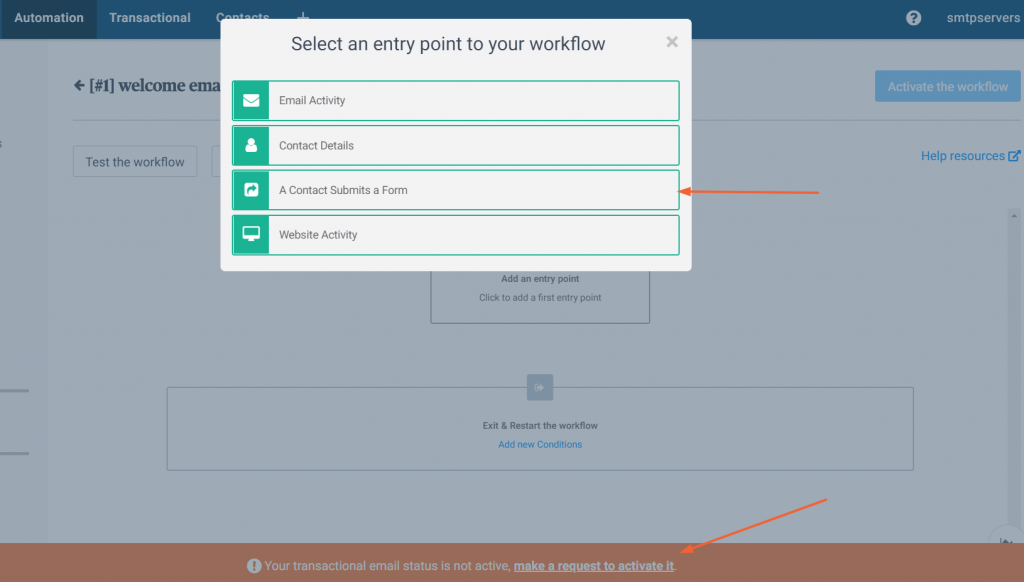
- Make sure you have activated transactional email status as shown at the bottom of the image (in the footer), When you click on “Add an entry point” then a pop up comes up you need to select Click on “A Contact Submits a Form” but for that you need to create a form first.
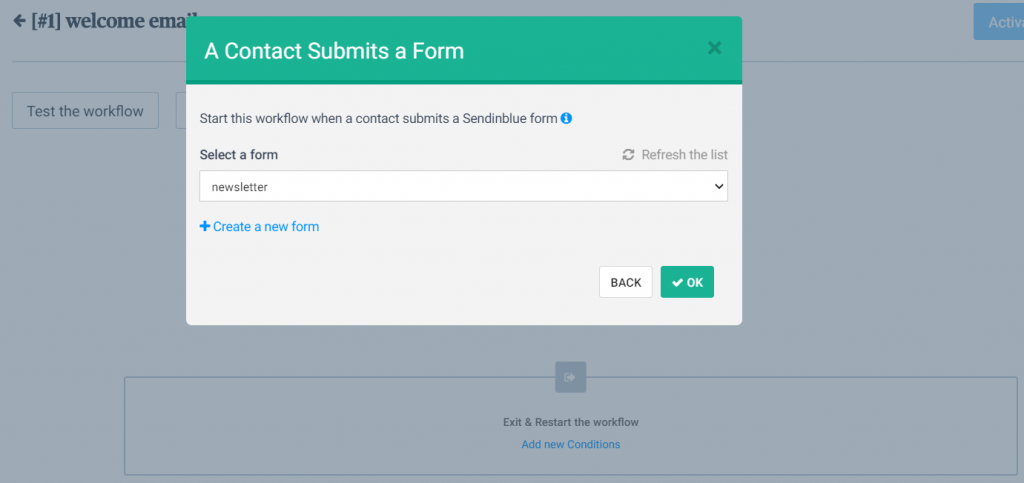
- I have created a form named “newsletter” anyone that submits this form will be eligible for this welcome email automate email.
Choosing from already present Workflow Library (you can customize it as well)
- Under automation tab (header) in your dashboard you can click on “create a workflow” then in the right side menu “Improve engagement” will be selected by default. The first tab will be of welcome message workflow choose this and then click on “create” button.
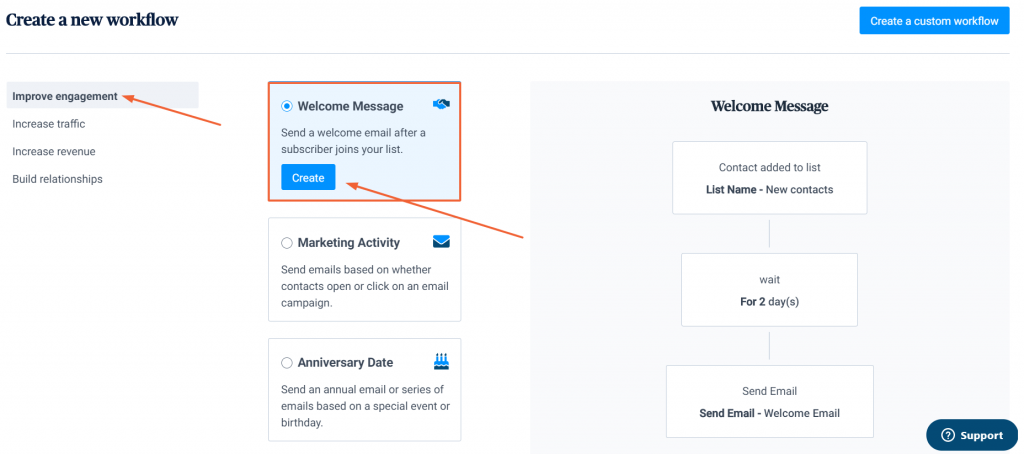
- It will be created automatically you just have to fill in the details about the campaign make sure that you have your subscribers list prepared before hand along with the email template.
Learn everything to know about autoresponders with our complete guide where we have in-depth covered top automation tools and steps to use them efficiently.
Do send time optimization & send emails at the best time – Each individual is different
Online you will read thousands of articles regarding the best time to send emails and hundreds of studies conducted just to find out the optimal time to send your emails. My take is EACH INDIVIDUAL IS DIFFERENT !! Let the automation do the job in identifying the best time to send the email to an individual. Hence this is our second in our list of email best practices.
Although when the machine learning process is going on you need to start with something? And here the best time to send your emails that are suggested by genuine big leaders in the industry that has processed thousands of individual data and email opening habits come to the rescue. If you want proof you can read our detailed article on the best time to send email campaigns. But let me summarize it here –
BEST DAY TO SEND YOUR EMAIL CAMPAIGNS ARE –
- Tuesday
- Thursday
- Wednesday
If you want a detailed answer you can click on best day to send emails and we have everything in detailed covered for you.
BEST TIME TO SEND EMAILS ARE –
- 6-7 AM
- 10-11 AM
- 2 PM
- 8 PM to Midnight
I will highly recommend to go through our detailed best time to send detailed guide to get more appropriate answers.
How to do Send time optimization?
I am assuming you had signed up for learning the automation technique.
Hope you are ready to learn how easy it is to use tools like sendinblue to determine the best time to send email campaigns for each individual. We have covered just a single tool as an example but in our send time optimization guide, we have covered several more players that you can use to set this up along with steps for each player.
Now to start sending your emails I hope you have made an email campaign and your email list must be ready? If you have any difficulty you can read how to use Sendinblue Drag N Drop campaign builder
Once you have designed your emails using the Sendinblue Drag N Drop campaign builder, you need to schedule your emails.
Almost all the good email providers have this feature if your email providers do not have this feature you should rethink about changing your email provider –
- Send Now
- Schedule for some specified time
- Send in at the best time
Choose “Send in at the best time” to let the Sendinblue automation do wonder with your email campaign.

When you choose “send it at the best time” it lets you choose just the day on which you want to send your emails and the rest is done by machine learning, it determines the past habits of each individual. How each individual has opened your emails in the past, at what time this feature can automatically determine when is your recipient more likely to read your emails.
How the best send time is determined?
As I have mentioned above that each individual is different and for each person send time should be different, their is no universal send time for groups this is outdated !!
Suppose a recipient is already in the SendinBlue database and he has been receiving emails from Sendinblue. The Sendinblue notes the time each individual opens the emails that have been sent to him.
All the major automation players determine the best send time by noting the past open time of the recipients and saving them in their database. With time the more email campaigns that you send more data, it feeds to the algorithm, and prediction of the best time becomes better and better. It drastically improves your open rates and ROI.
Now it might occur to you what happens if you have an urgent email campaign to send on the same day? Most players let you send the campaign on the same day but suppose if you have recipient A that reads all the emails at 8 A.M in the morning daily now you go to the office make an email template to send to your email list around 12 about a product launch that is going to happen the same day at 6 P.M then “Recipient A” will receive the email the next day at 8 A.M
So I recommend not using this “send emails at best time” option for time sensitive campaigns.
Read about Free SMTP Providers and how to use them in your WordPress website to send free emails
Use drip campaigns, set the right frequency – don’t overdo!
It is a slow marketing technique used by marketers to create a brand presence in minds of customers. When you see a product or service you will not buy it at once you will research it on various platforms. A consumer is slowly given information through automated platforms so that the consumer is able to understand the product and is not overwhelmed by the vast product information that you provide. Hence it has a direct effect on your revenue, so it the third on our list of email marketing best practices. We got a full article on Drip Campaigns waiting for you if you wish to in-depth.
When sending drip campaigns maintaining the right frequency of emails is the most important or you can annoy your users. Which, can lead to a decrease in trust in your brand value.
How many emails should you send per week?
According to many studies that I have come through while researching for this content I found that most marketers prefer to send just 1 newsletter per week. The open rate is over 33.40% and CTR 4.65% according to GetResponse.
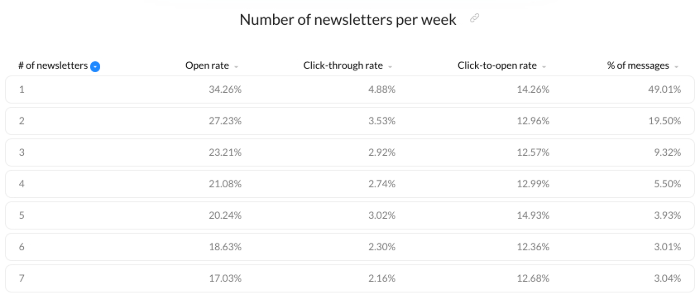
The aim of marketing is to generate revenue, weather you are sending one email a week or one every day. You should earn more than you spend.
But you must be thinking the more the merrier, this might not hold true in the marketing world.
When you decide to add one extra campaign, there are three things that you need to consider –
- How much you are going to spend on the campaign and how much extra revenue you are going to make
- How many subscribers left your list after that extra campaign, due to receiving too many emails
- Most important – Calculate the cost of lead replacement that you have lost after the extra campaign
I want to highlight an old study by Return Path in 2015 that has covered the consequences of both undermailing and overmailing.

So according to a study both under mailing and Over mailing had their devil’s and I personally think it also depends on how creative you make your emails to be. According to the study sending, 5 or fewer emails per week is fine but I think they are a lot. I think from experience 1 to 2 emails per week is more than enough.
However the quality of the emails should always remain the same. Even if you use videos in your emails, it’s essential to maintain a seamless and enjoyable viewing experience for your audience, perhaps by integrating a reliable HLS player online.
How to control your frequency?
Most of your email providers let’s you send automated emails at the time you want. You can automate the emails to be send at a frequency you desire to be fit. Like in the above part I highlighted the steps for an transactional welcome email that you can send instantaneously when one subscribes for your newsletter. But you can also create a custom workflow where you will be able to control when your recipient perform an email when does he receive an email it can be the same time or perhaps two day’s later.
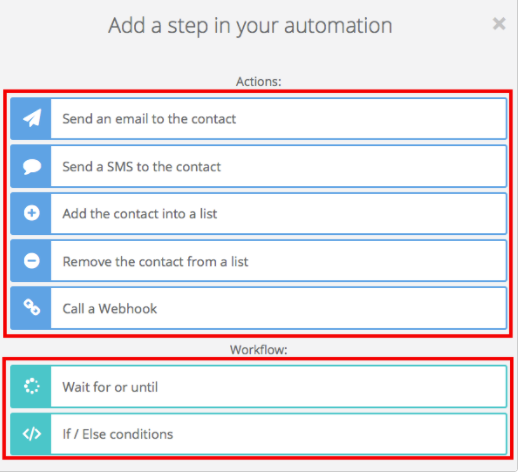
When you are creating a custom workflow you can set your own time and frequency of emails. The workflow that you want your users to enter. You can read about automation on Sendinblue here.
Follow GDPR guidelines and the can-spam act of marketing
If you are entering the marketing world you should know that all the marketing acts of sending emails or SMS etc. are governed by GDPR guidelines in the European territory. That means if you are collecting any data of any European citizen irrespective of your company’s location, you will fall under GDPR guidelines. They are the data protection laws in place to save your data privacy and how is your data being used by companies.
What happens if you are found to be violating GDPR guidelines?
Either you are fined 2-4% of your annual revenue or you can be fined upto 20 million dollars.
Some of the companies that follow GDPR guidelines thoroughly are SendinBlue, Constant Contact, GetResponse, Aweber etc.
You should look at all these email best practices while sending your email campaigns –
- Did you take the consent of your recipients for receiving your emails?
- The consent that your recipients are giving and the purpose for which you are using their information should be in sync. For example, if they only opted into your newsletter list, this isn’t sufficient consent to use their data for a marketing automation workflow.
- The law states that minors under the age of 16 may not give their consent without parental consent.
With data protection laws becoming strict, you should keep the GDPR best practices in mind. You can read our article on the Can-Spam Act of Marketing for detailed understanding.
I found this page which has almost all the information that you will require regarding GDPR
Couple SMS alerts with your email campaigns – get the best results!
Emails without SMS are like fish without water. It had to be included in email marketing best practices. The single biggest drawback of emails is its dependency on the internet, which when you couple emails with SMS campaigns it can easily be overcome. Some people’s are not that friendly with emails especially in developing and under-developed countries still has poor internet & power connection. It is the best practice to couple your emails with text SMS, it gives the optimum output.
Why Send SMS and Email Together?
Every consumer is different, and your consumers need not have the same preferences when it comes to business communication. According to a study 2019 Email Benchmark, people depending on their generation (age) and demography (developed, developing or under-developed) countries have different preferences that is why you should opt for both if you have an international business.
As you can see in the image below we still see a huge acceptance for SMS.

We need to give choice to consumers on how they want to interact with your brand. Using both the channels of communication gives a better changes of conversions. Plus, you should invest in email verification to ensure your messages reach valid and active email addresses.
How to couple SMS campaigns with Emails –
Let’s start with Signing Up and then logging in your dashboard.
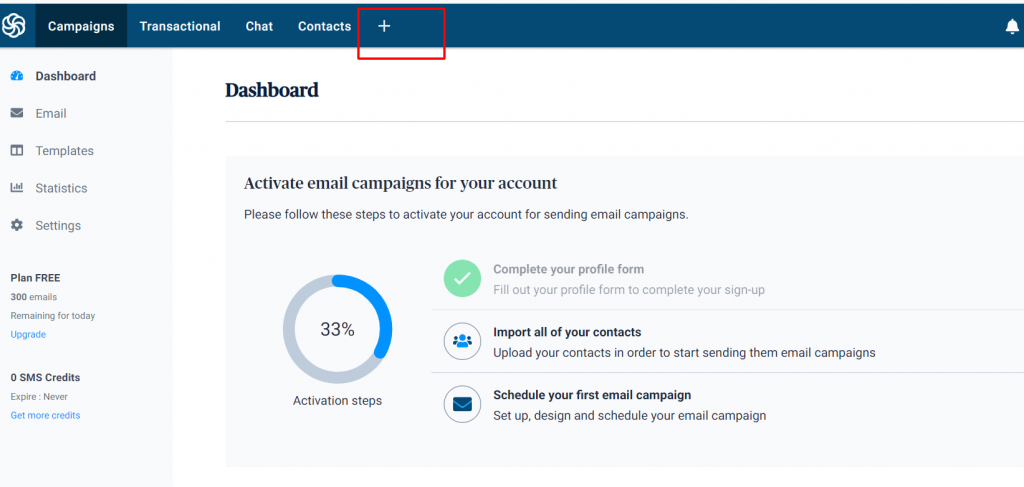
- In the header of your dashboard, you must be seeing a + sign as marked in the above image
- Now you need to activate your SMS campaigns option, by default it will be deactivated. Please make sure while uploading your database that you have phone numbers defined. All the phone numbers must be saved in the column (attribute) labeled as SMS. Also, you need to put the country prefix in font of each phone number. So it gets a little tricky. If you have any doubts about creating your contact lists, here is how you can do it.

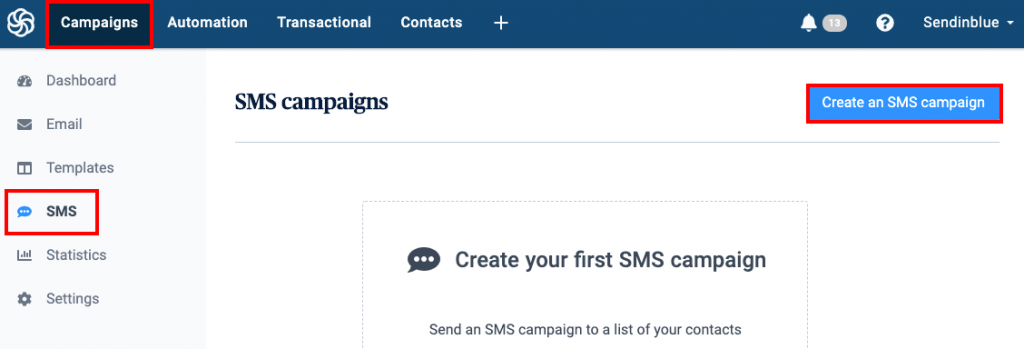
- Now in the header of your dashboard under the “campaigns” tab, you choose SMS on the left side and then click on “Create an SMS campaign”
- Now name your campaign and you can also create a customized sender name, which your SMS campaign receivers will see. But for some countries like the USA, this customized name is not shown to the receivers instead they will see some random alphanumerics.
- Once you create a name for your campaign, now let’s move on to adding a message to it. As you must be aware that any SMS campaign should be less than 160 characters including spaces and enter. Also in these 160 characters, you need to give an OPT-OUT Option, otherwise, you can land in trouble as we have discussed above in the GDPR Guidelines.

- Once you have created your campaign now it is time to test your SMS campaign, I want to point out that the tests that you do are not free and each test will be deducted from your SMS credits that you buy.
- Now that you have tested out your SMS message and everything is in place you need to choose your recipients for your campaigns, you can also apply segmentation like send SMS to a person who has just subscribed or to a person with a particular trait or is based on the location. But to do so you need to define the traits of the list that you have uploaded.
- Now that you have done the segmentation and created an awesome SMS, now is the time to start it either scheduling it on a particular date and time or you can send it immediately.

Check out our article on why Sendinblue is the perfect Mailchimp alternative, – SendinBlue Vs Mailchimp – Complete Comparison!
Use awesome looking email templates
Just sending boring looking emails is not good enough, you are sending emails keeping an aim in mind. You have spent time, money in creation & sending your emails, make it worth while. Sending just plain, dull-looking emails is so out fashioned, marketers now are taking risks, being creative in everything that they do. Let’s look at why sending a good looking campaign, is an email newsletter best practice.
What smart content do to your emails ? Example
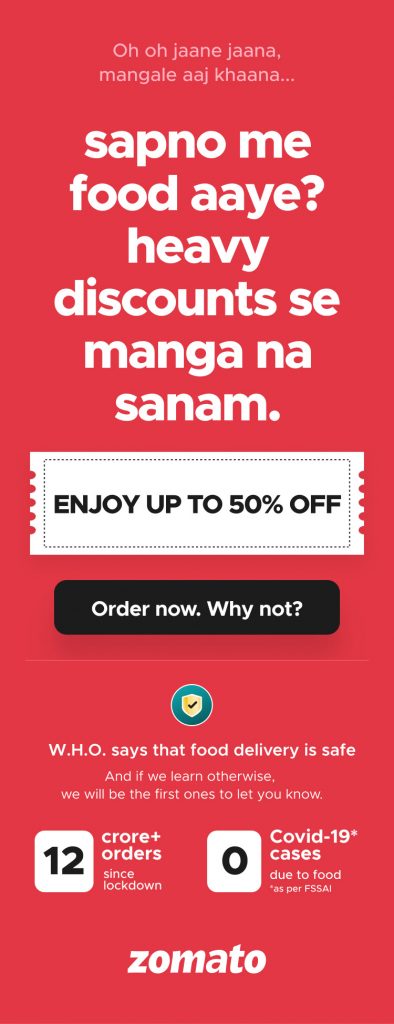
I am from India, we have Zomato (a food delivery) company. Recently they are running an email campaign in which they are using old famous Hindi dialogues and songs as subject lines. In the start I found it hilarious they typically send one email in two days along with the transactional emails (order, tracking, payment and stuff)
Subject line used by Zomato(Note the use of Emojis) –

I have open 4 emails that they have sent in the last 7-8 days and it is strange that I now look forward to their emails, what quirky line will they send this time when I discussed this will some of my friends generally that same thing is happening to them as well. It does not show that it must be having a major increase in their open rates but the zomato can answer this question?
But i strongly feel that it must have been a case!!
Here is the complete email template look how clean and to the point it is, they are also highlighting the “WHO” and “FSSAI” to create a trust, that’s great.
If you like what we are talking about we have a complete detailed article on Newsletter Examples, in which we have covered all the amazing looking examples.
Here is a brief about how to make cool looking emails with awesome content using drag n drop email builder, let’s get on to it –
- Once you are in your dashboard and you have imported your contacts click on “create a new campaign”
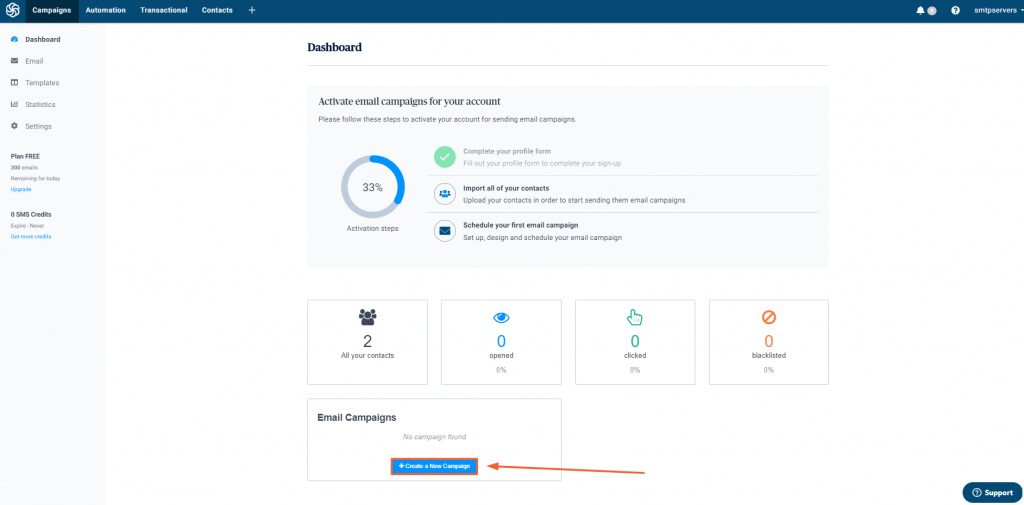
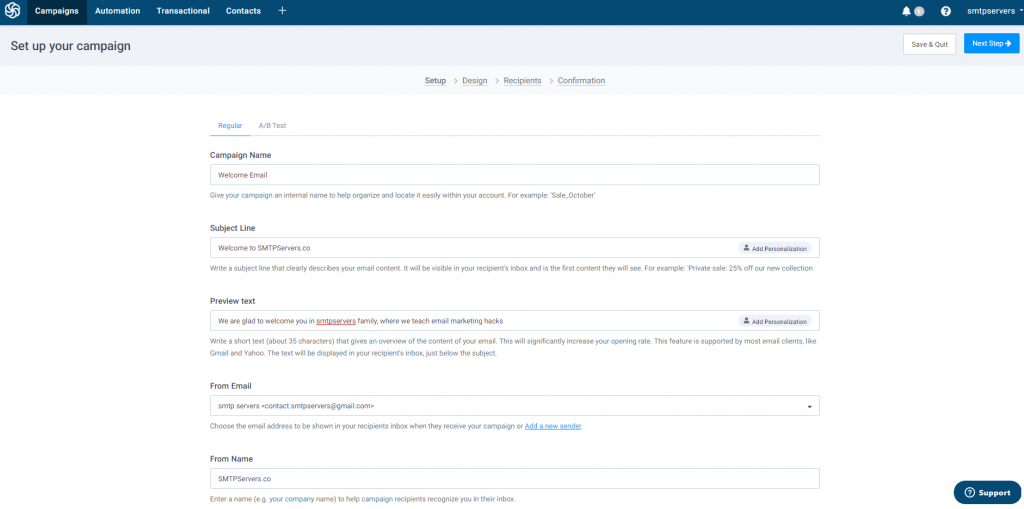
- Setup your campaign by filling the following fields-
- Campaign Name – An internal Name that you want to assign to your campaign.
- Subject Line – The subject line is the first content that your recipients interact with, Make it short, crisp, and to the point. It should describe your email content aptly.
- Preview Text – This is the overview of your content, when combined with a good subject line have a drastic effect on your opening rates.
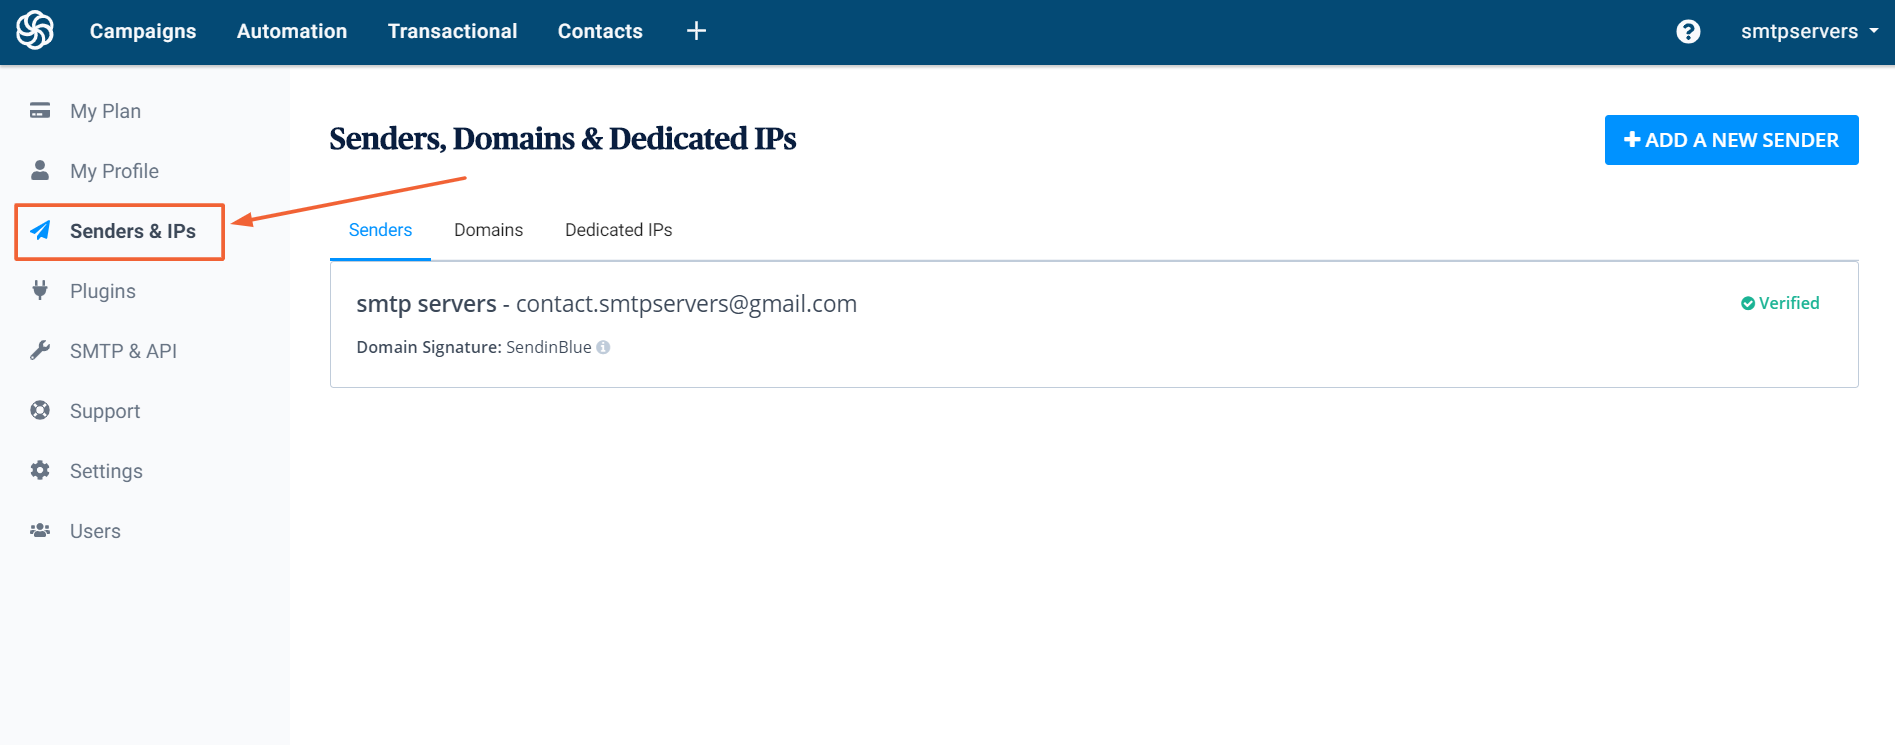
- From Email – It is by default the registered email ID of your account, but you can change it anytime you want just by clicking on the “Add a Sender” link just below the tab. Or you can add a sender by clicking on Senders & IPs in your dashboard home as shown in the image below –
- From Name – It means the Name of your company or your personal name so that your recipients can identify who has sent the email. Under this, you will see an “advanced options” link. When you click the link we have explained the fields below.
You can actually customize so many things in advanced options like –
- Customize the Reply-To Email address- The default value is [DEFAULT_REPLY_TO]. It is your registered email address which you have used to create the Sendinblue account. If you want to change the Default Reply-to, go to the ‘Advanced Settings tab’, under ‘Default Settings’ you can modify it. This value enables you to use your default ‘reply to’ for the lists that you have already created.
- Customize the “To” Field – You may personalize the ‘To’ field with contact attributes, e.g. {{ contact.FIRSTNAME }} {{ contact.LASTNAME }} will populate the first and last name of the recipient (as in your database that you uploaded) so that instead of receiving an email addressed to ‘[email protected]’, your contact will receive an email addressed to ‘John Smith’.
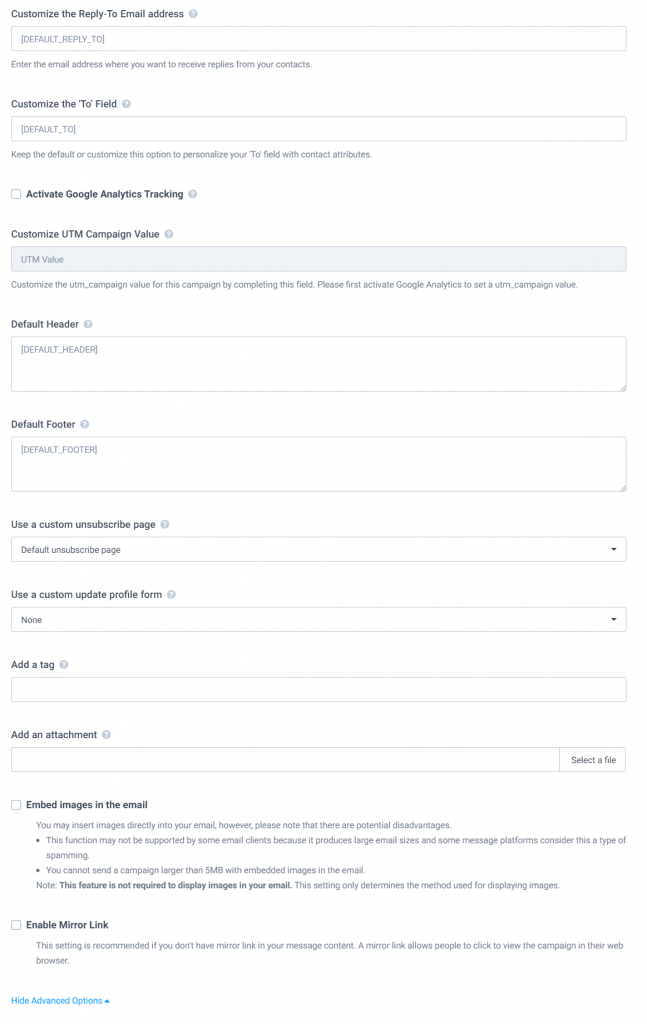
- Activate Google Analytics Tracking – For this you need to integrate sendinblue to your google analytics so that the default parameters sent to Google Analytics for each campaign will be –
- UTM_SOURCE: SENDINBLUE
- UTM_MEDIUM: EMAIL
- UTM_CAMPAIGN: NAME_OF_YOUR_CAMPAIGN
- Default Header – Update this field to override your default header with a custom header. Or, you may update your default header for all campaigns by going to Campaigns > Settings > Advanced Settings and modifying it under ”Default Settings”. If your email will be designed by inputting your own custom HTML code, erase this field to prevent SendinBlue’s automatic sections from interfering with your code. Example header: Click {here} for mirror link. Note: Only the text included inside ”curly braces” will be clickable.’
- Default Footer – Update this field to override your default footer with a custom footer. Or, you may update your default footer for all campaigns by going to Campaigns > Settings > Advanced Settings and modifying it under ”Default Settings”. If your email will be designed by inputting your own custom HTML code, erase this field to prevent SendinBlue’s automatic sections from interfering with your code. Example footer: Click here to {unsubscribe} from future messages. Note: Only the text included inside ”curly braces” will be clickable.
- Use a custom unsubscribe page – Select a specific unsubscribe form to be used for this campaign. This setting is generally used for managing several languages.
- Use a custom update profile form – You can read about customized update profile forms here in detail.
- Add a tag – You can add one descriptive tag to your campaign to enable quick searches. E.g. use the ‘sales’ tag to find all sales campaigns in one click.
- Add an attachment – Choose a file to attach to your email (4MB maximum). Accepted file types: ics, xlsx, xls, ods, docx, doc, csv, pdf, txt, gif, jpg, jpeg, png, tif, tiff, rtf, msg, pub, mobi, ppt, pptx, eps.
Now hope you have click on the “next step” button in the top right side.
Moving onto the design aspect of your newsletter –
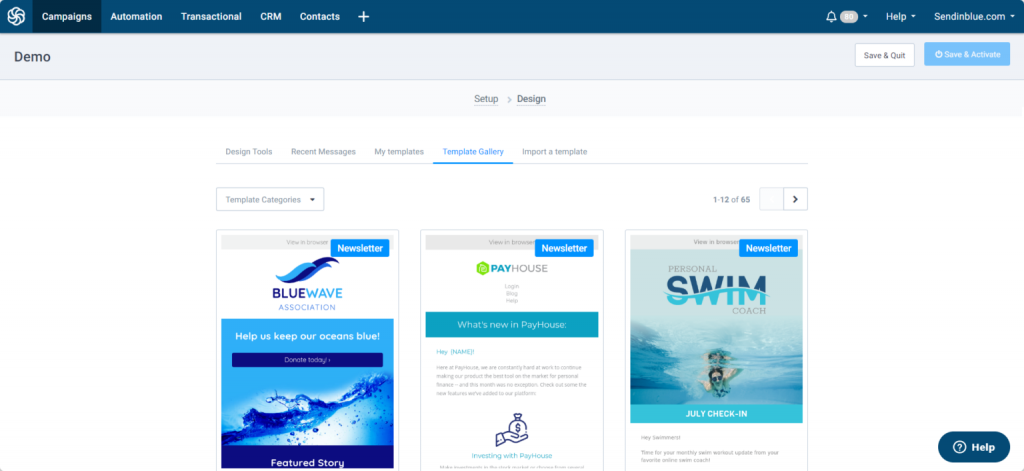
- The next screen will look something like the below image. To use pre-made templates (108 different templates) choose “Template Gallery“. You can make changes in the email template that you choose according to your requirements. Then save the template, the save button must be present in the right top side.
- Once you save the template move on to the next step (Recipients), Now choose the list which you want to choose to send your email campaign.
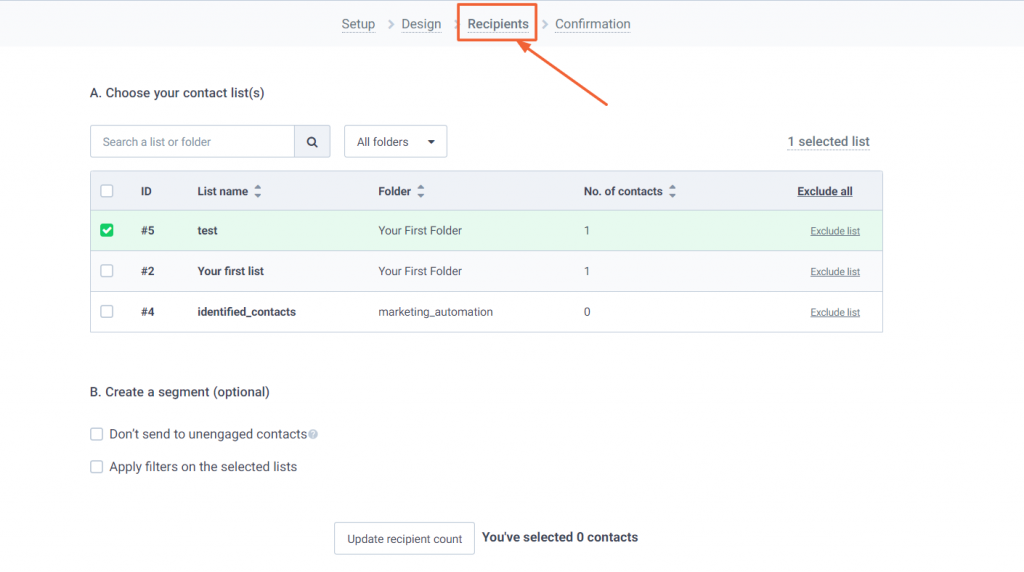
- In this step, you can also define what you want to do with the unengaged contacts, as you can see in the above image under the heading “B. Create a segment (optional)”
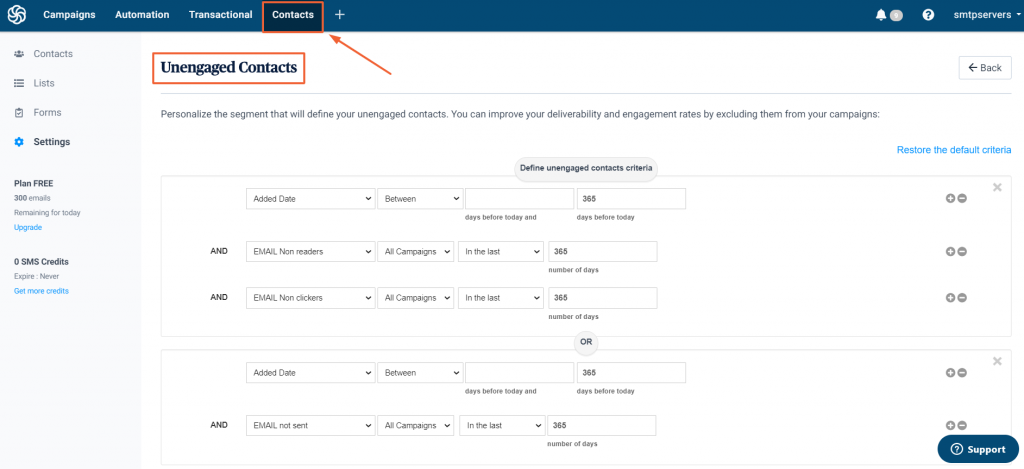
- You can also define what is unengaged contacts under the contacts tab in your dashboard home check out the image below for better understanding.
- Click next step, in this step you can check out your email campaign like the design or the list you have chosen so that you do not make any mistake. Now schedule your campaign.
Use RSS feed URL to gain the maximum output + traffic!
This is something that I can tell you from experience, this is the best email practice that you should follow, using RSS feed URL automation to send the newsletter, For those who are new to email marketing, you can read what is RSS Feed here. If you are aware of what is an RSS Feed but want to learn how RSS Feed works.
Let’s look at how to automate your RSS Feed URL so send an email to your subscriber list whenever you publish a new content
- Create an account
- I guess you must have logged in to your dashboard by now, click on the + sign at the top of your dashboard as shown in the image below.
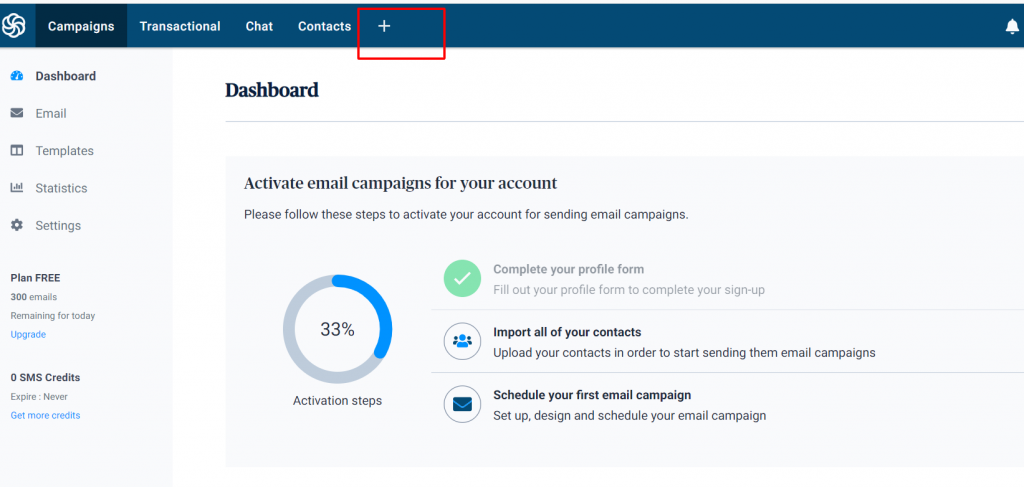
- When you click the + tab you will be directed to the “Apps” tab by default but you have to choose the “Integrations” tab. Drag down and select the “RSS Campaign” as shown.
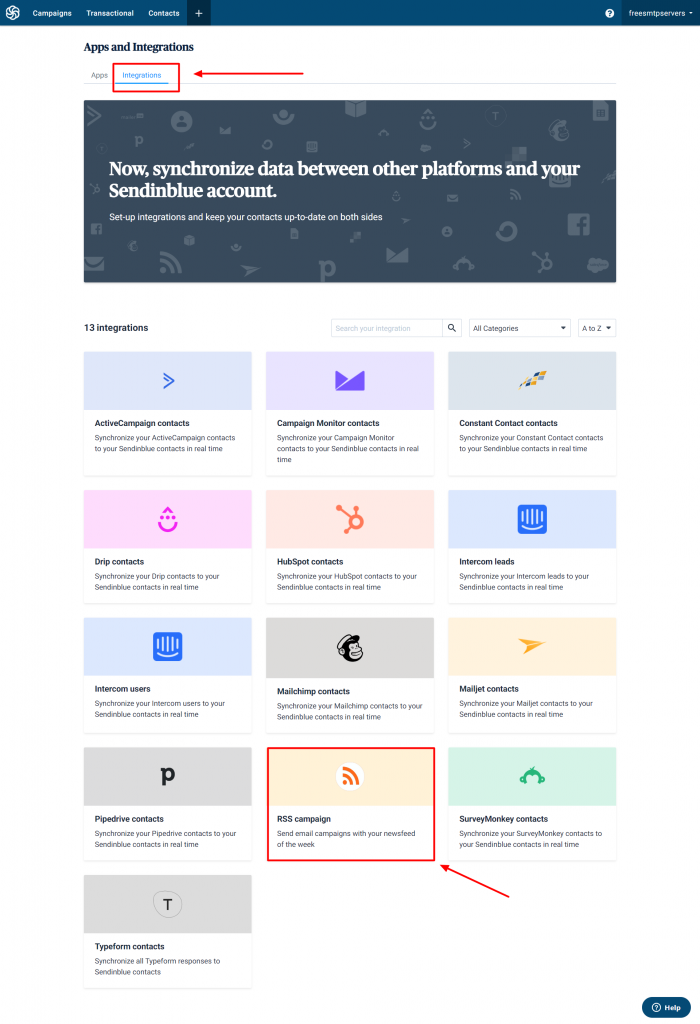
- Name your integration and click create integration

- Then you need to enter your feed URL and click on Load RSS Feed, you must see the complete RSS feed of the link that you put in your Sendinblue dashboard
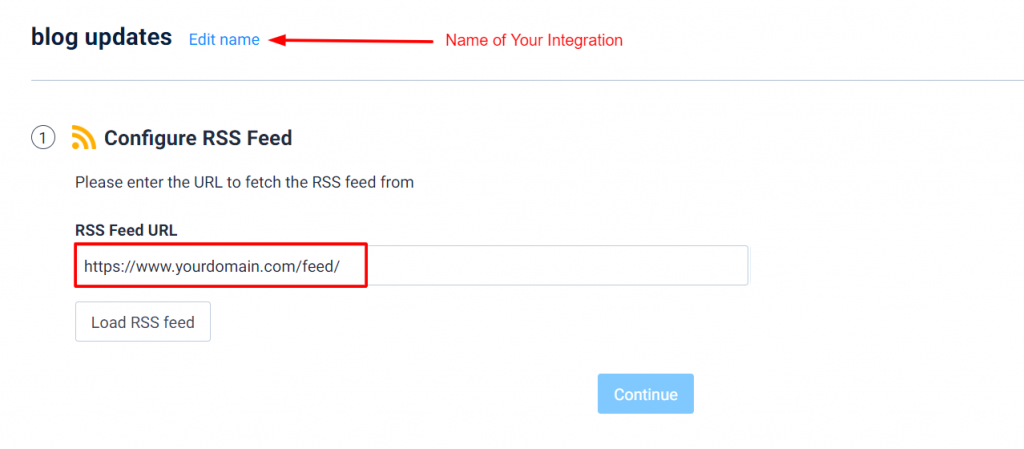
- When you drag down you can see the predefined fields which can be customized.

- When you move onto the next step by clicking the continue button you can either choose an automated Sendinblue email template that Sendinblue creates for you or you can design your own email template. I recommend using the RSS default template. Once you choose this you can now edit the email template that they create for you. Or You can create a new template at any time from Campaigns > Template

- Now moving forward with customising your email template You can change the elements from your RSS feed in your email template.
- To call tags from the channel, you should use {{params.feed.XXX}} (where XXX should be replaced by the tag name)
- To call tags from an item, you should iterate over the dynamic list {{params.items}}Example: To call the <title> from channel, write: {{params.feed.TITLE }}
To call the <pubDate> from channel, write: {{params.feed.PUBDATE }} To call a tag from my different items, create a loop that will iterate over the dynamic list {{params.items}}.
- You can use the variable name item for each element of your list
- To call the <title> from an item, write: {{ item.TITLE }}
- To call the <pubDate> from an item, write: {{ item.PUBDATE }}
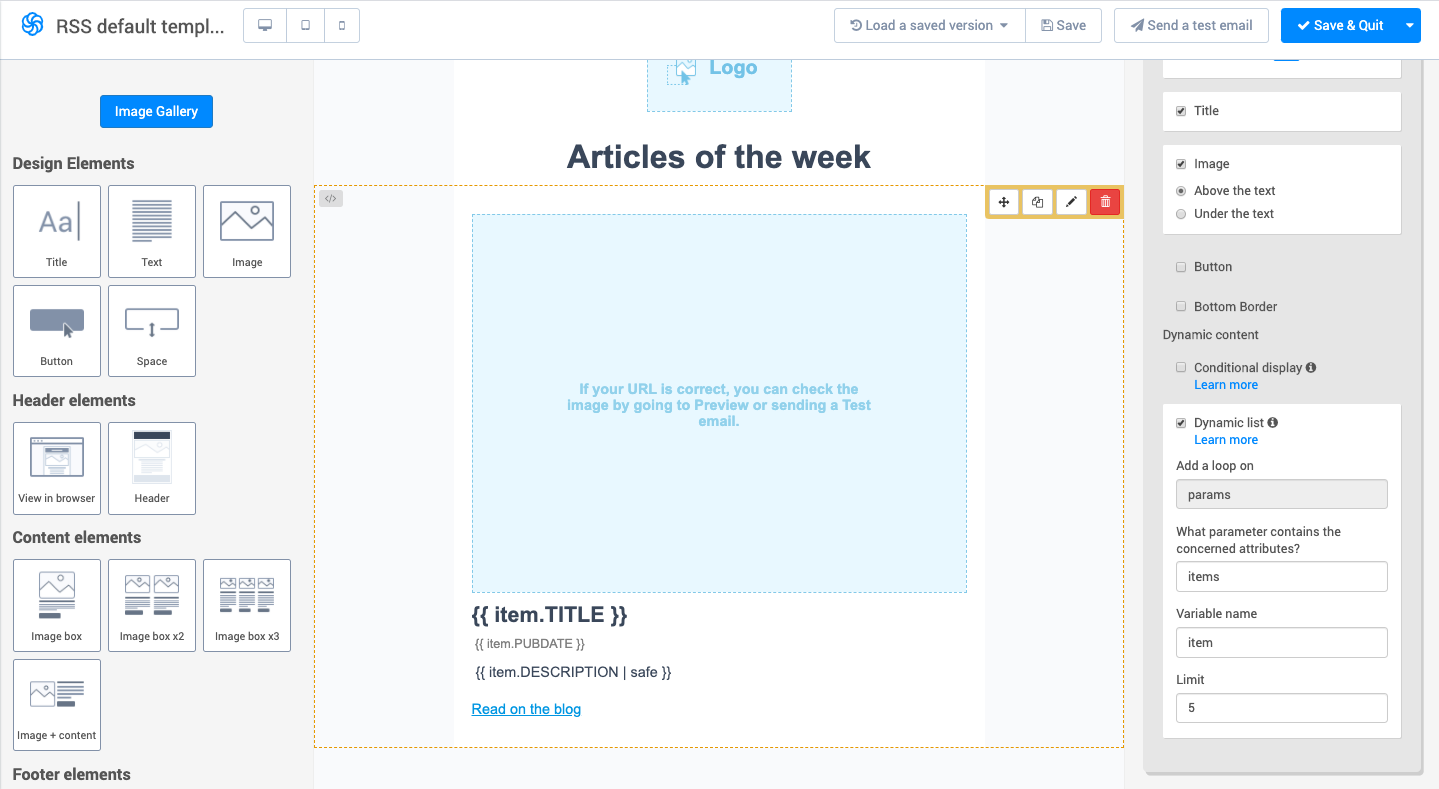
- Here is an article for you for dynamically pulling some elements in your emails.
- Now that you have designed your email you can select the list of your subscribers that you want to target for sending the updates. Before sending to the entire list I will recommend creating a dummy list with 3-4 email ID’s of yourself and your known persons, try to include persons with different devices to view your email. Test the email before sending.

- Now all you have to do is customize your email campaign settings according to the RSS feed tags that you saw in the earlier steps. I would like to point out that with Sendinblue you have the ability to customize the email campaign name along with the email campaign subject. For your better understanding For example –
- Say you want to display the date of the first article on the subject of each email created.
- You published an article on Tuesday, 15 July 2020, then a second article on Wednesday, 16 July 2020.
- You would like your contacts to receive an email with the dynamic subject: “Articles for Tuesday 15 July 2020”
- Choose when to create and schedule new campaigns. By this option, you determine how frequently will it check for your emails. You can also automate it to send the emails on specific dates and times or choose specific dates per month to schedule your campaigns. Sendinblue automatically checks for new content and an email campaign is made only if new content has been published.

- Activate your integration by clicking on Save and Activate button. You can also choose from the option of saving your campaign and keeping the campaign inactive.
- You will be redirected to the Integrations page, where you can view the newly created integration.
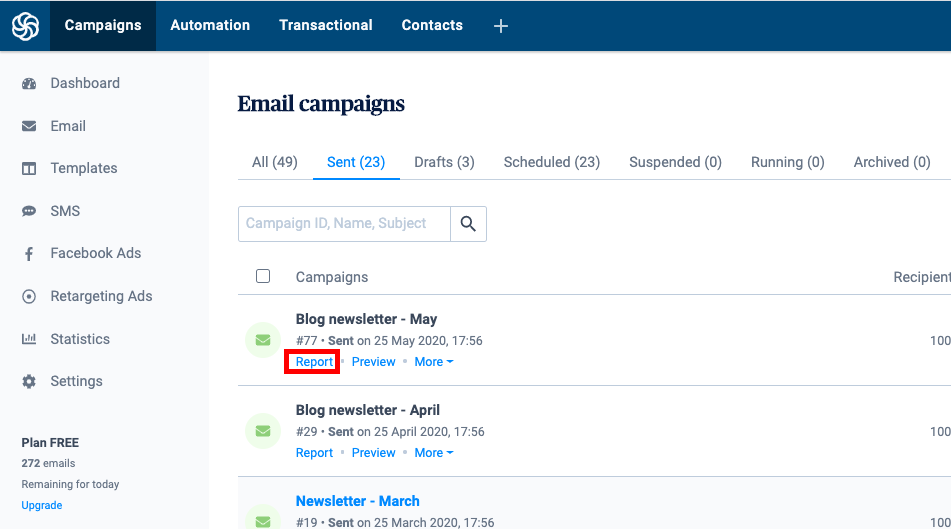
- You can check your campaign reports at any time from the Campaigns > Emails section.
Avoid your emails going to spam folder – better deliverability
Suppose you have created a very good looking email. You have done everything possible, and have kept in mind all the email best practices. Now you send your email but it lands in the SPAM folder what good is your campaign? Getting your email in the inbox of your email lists is most important and you need to keep in mind these email best practices to avoid your emails ending in the SPAM folder –
- Make sure the contacts in your recipients list exist
- Don’t use purchased email lists
- Keep on removing unengaged users
- Don’t send poor quality emails
- Keep consistency in sending your emails
General FAQ
What are email marketing best practices?
- Automating your emails – Work Smart not Hard!
- Do send time optimization & send emails at the best time – Each individual is different
- Use drip campaigns, set the right frequency – don’t overdo!
- Follow GDPR guidelines and the can-spam act of marketing!
- Couple SMS alerts with your email campaigns – get the best results!
- Use awesome looking email templates
- Use RSS feed URL to gain the maximum output + traffic!
- Try to avoid spam folder – better deliverability
- Create a list that is interested in your emails
How many emails should you send per week?
According to many studies that I have come through while researching for this content I found that most marketers prefer to send just 1 newsletter per week. The open rate is over 33.40% and CTR 4.65% according to GetResponse. Read more about the number of emails you should send in detail here along with things to consider while sending an additional email.
Why Send SMS and Email Together?
Every consumer is different, and your consumers need not have the same preferences when it comes to business communication. According to a study 2019 Email Benchmark, people depending on their generation (age) and demography (developed, developing or under-developed) countries have different preferences that is why you should opt for both if you have an international business. Read more stats about why sending emails campaign with SMS messages is a must do email best practice.
Pingback: Free SMTP Servers & How to use them to send FREE EMAILS! - www.SMTPServers.co
Pingback: KEY FACTORS TO CONSIDER BEFORE STARTING AN EDTECH STARTUP – saasgenius.com